If you’re a travel enthusiast and a landscape photography aficionado, capturing the vast beauty of scenic landscapes often leads to creating stunning panoramas. The wide expanse of nature deserves to be caught in all its glory, and that’s where photo editing software like Luminar Neo steps in. Skylum, the creator of Luminar Neo, has recently introduced the Panorama Stitching extension, a powerful tool designed to help photographers like you transform individual shots into breathtaking panoramic masterpieces.
This comprehensive guide will explore everything you need about the Luminar Neo Panorama Stitcher. You can also check our comprehensive guide about Panorama Photography.
Introduction to Luminar Neo’s Panorama Stitching Extension
Luminar Neo has been making waves in the world of photo editing software for years, and the introduction of the AI Panorama Stitching extension marks a significant milestone. This extension is a game-changer for photographers looking to elevate their landscape photography by seamlessly stitching multiple images into panoramic vistas.
How to Access and Use the Panorama Stitcher Extension
Before we dive into the intricacies of creating stunning panoramas, it’s essential to understand how to access and use the Panorama Stitching extension. It’s seamlessly integrated into Luminar Neo, ensuring a hassle-free user experience.
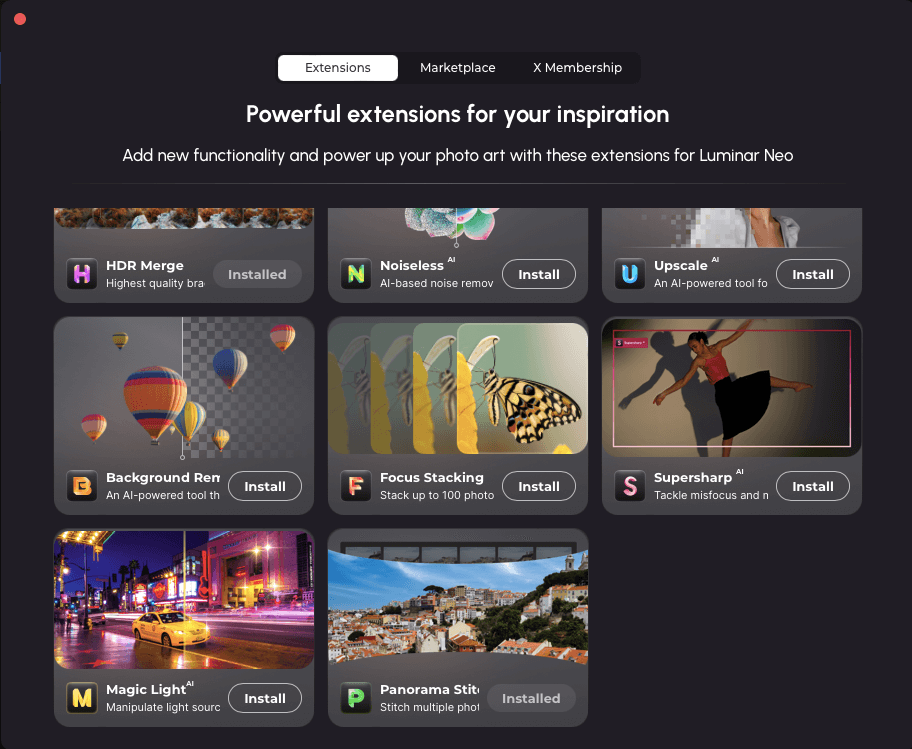
To access this extension, you must be a Luminar Neo Pro subscriber, which is available at affordable price (to get an additional discount, click here). The Panorama Stitching Extension is available within Luminar Neo. If you have purchased the Luminar Neo Pro subscription plan or the Panorama Stitching Extension separately with your lifetime license, it will be available in the Extensions tab.
Importing Images and Videos
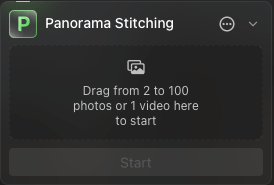
Creating panoramic masterpieces begins with importing your images or videos into Luminar Neo’s catalog. Whether you’re working with raw files, JPG stills, or even video clips, Luminar Neo’s Panorama Stitcher can handle it all. The software’s flexibility in supporting different media types is a testament to its commitment to catering to various photography styles.
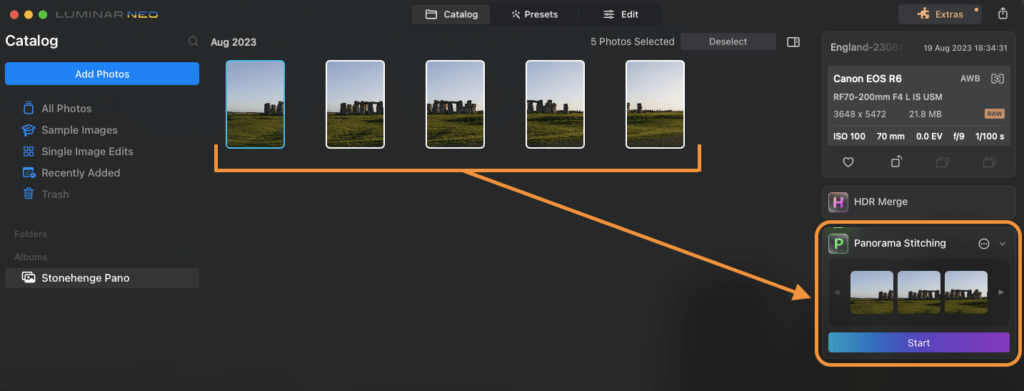
The process is intuitive – just import your media into the catalog, a step that should be familiar to anyone experienced in photo editing. Once your files are ready, navigate to the Panorama Stitching module under the catalog’s right-hand tab. It’s as simple as dragging and dropping your media into the extension and hitting “Start.”
Choosing Projection Methods
The heart of panorama creation lies in selecting the right projection method. Luminar Neo offers a range of options, including the usual Spherical and Cylindrical projections, but it goes a step further with Mercator, Plane, and Fisheye projections.
The choice of projection method depends on your subject and the look you want to achieve.
For instance, the “Plane” mode is excellent for architectural imagery, keeping straight lines intact while stretching the edges.
“Mercator” minimizes vertical stretching, preserving horizontal lines, making it suitable for various scenes.
“Fisheye” excels in handling wide-angle shots, even correcting diagonal lines that might appear curved with other methods.
I added more detail on the projection methods later.
Manual Warping for Adjustments
Once you’ve chosen your projection method, it’s time to fine-tune your panorama using manual warping. This step is where your creative vision takes shape as you adjust the curvature of your panorama.
Click and drag on the image to make adjustments, aided by a crosshair overlay that guides you in flattening any unwanted curves. The power of Luminar Neo’s manual warping shines as it allows independent adjustments to the left and right sides of your panorama. This flexibility enables you to straighten edges or balance scales with precision. Additionally, you can rotate the entire image when needed by hovering your mouse outside the image frame.
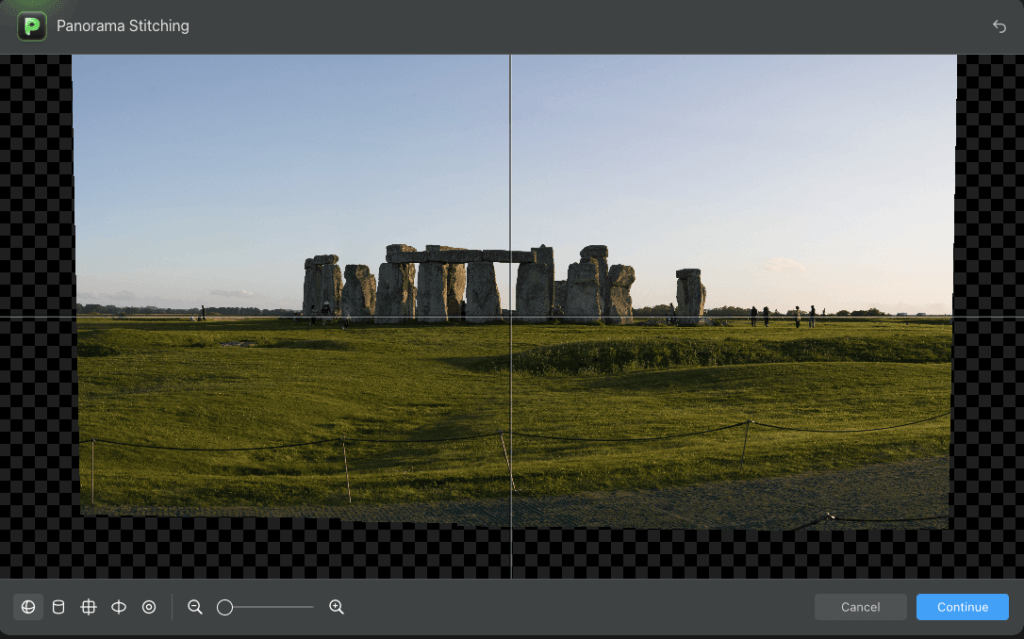
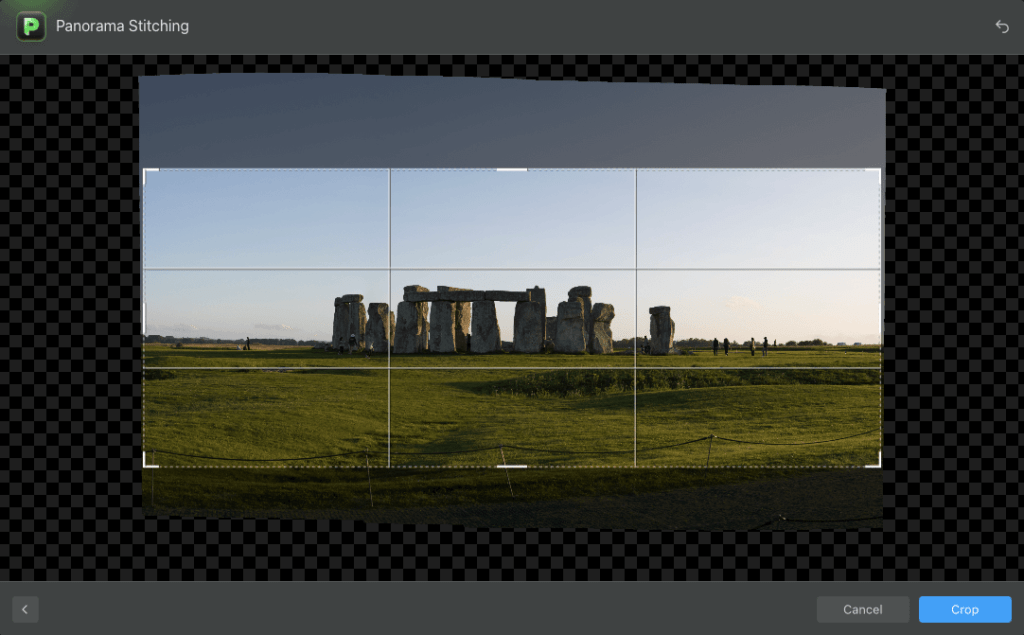
Cropping Options
After perfecting the projection and fine-tuning your panorama, the next step in the Luminar Neo Panorama Stitcher is cropping. This interface offers various cropping options, allowing you to refine the composition of your panoramic masterpiece.
While there’s an option to “Maximize Crop Area,” giving you a broad view of your panorama, you can also customize the crop to achieve specific aspect ratios. However, it’s worth noting that the ability to dictate a precise crop aspect ratio might be a welcome addition in future updates.
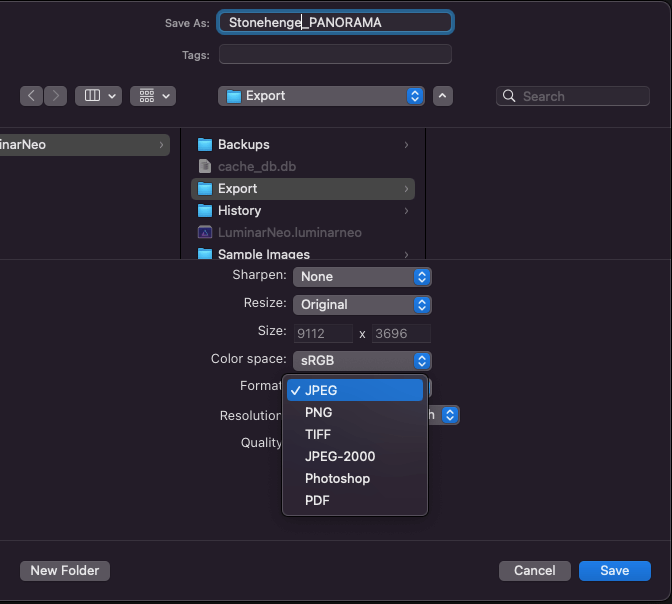
Saving the Final Panorama
It’s time to save your creation once you’re satisfied with your composition. Luminar Neo provides multiple output options, ensuring flexibility in storing and sharing your panoramic image.
The software generates the final panoramic image file and saves it in a dedicated “Panorama Stitching” folder. While this organization is convenient, you can always drag and drop the panorama back into its original folder if you prefer keeping your images together with the source files. Having all your panoramas neatly organized enhances your workflow, making it easier to locate specific images when needed.
Skylum Luminar Neo’s Panorama Stitching – Pros and Cons
Luminar Neo’s Panorama Stitcher offers numerous advantages, making it a valuable tool for landscape photographers and travel enthusiasts. Here’s a brief overview of its pros and cons:
Pros:
Creating Panoramas from Videos
One of the standout features of the Luminar Neo Panorama Stitcher is its ability to transform video footage into panoramic images. This is a game-changer for travel photographers and videographers.
Often, capturing the perfect moment in a video involves panning left or right, showcasing an entire scene. However, manually taking still frames from videos can be impractical, especially when there are moving subjects involved.
That’s where the “Custom Object Composition” tool shines. When creating a panorama from a video, you can pause the video at any point and select your subject. Luminar Neo identifies the subject’s location within the scene and seamlessly incorporates it into the final panorama. This feature is handy and ensures that even dynamic scenes can be transformed into stunning panoramic images. You can learn all about composition here.
Action Composite Panoramas from Video Footage
The capabilities of the Luminar Neo Panorama Stitcher extend beyond traditional panoramic stitching. If you want to create action composite images using the same video footage, it’s a breeze. Simply pause the video at multiple points, select subjects or objects in each position, and let Luminar Neo work its magic. This functionality is perfect for capturing action-packed scenes, whether extreme sports or any dynamic activity you want to showcase creatively.
Versatile Stitching Method Options
What sets Luminar Neo apart from many other panorama stitching software is its versatility in stitching methods. While the standard Spherical and Cylindrical projections are excellent defaults for most images, the addition of Mercator, Plane, and Fisheye projections opens up new creative avenues.
- Plane Projection: This mode emulates the view you’d get with an ultra-wide-angle lens, preserving straight lines while stretching the edges. It’s ideal for architectural photography where maintaining perspective is crucial.
- Mercator Projection: Inspired by maritime mapping, this projection minimizes vertical stretching, keeping horizontal lines straight. It’s a valuable choice for scenes where horizontal elements are prominent.
- Fisheye Projection: When working with wide-angle shots, the Fisheye projection excels. It effectively balances all types of lines, including diagonal lines that might appear curved with other methods.
Built-In Manual Warping in Panorama Stitching Extension
The ability to manually warp panoramas is a standout feature of Luminar Neo. While it may seem daunting at first, the learning curve is surprisingly short. Once you grasp the nuances, you’ll appreciate the level of control it offers. I will cover more detail in another post.
This feature allows you to make subtle adjustments to different parts of your panorama, which is particularly beneficial for wide scenes with strong horizons or lines that need straightening. Whether you need to correct distortions or balance the sense of scale, the manual warping tool is a valuable asset in your panorama creation toolkit.
TIF vs. DNG Files
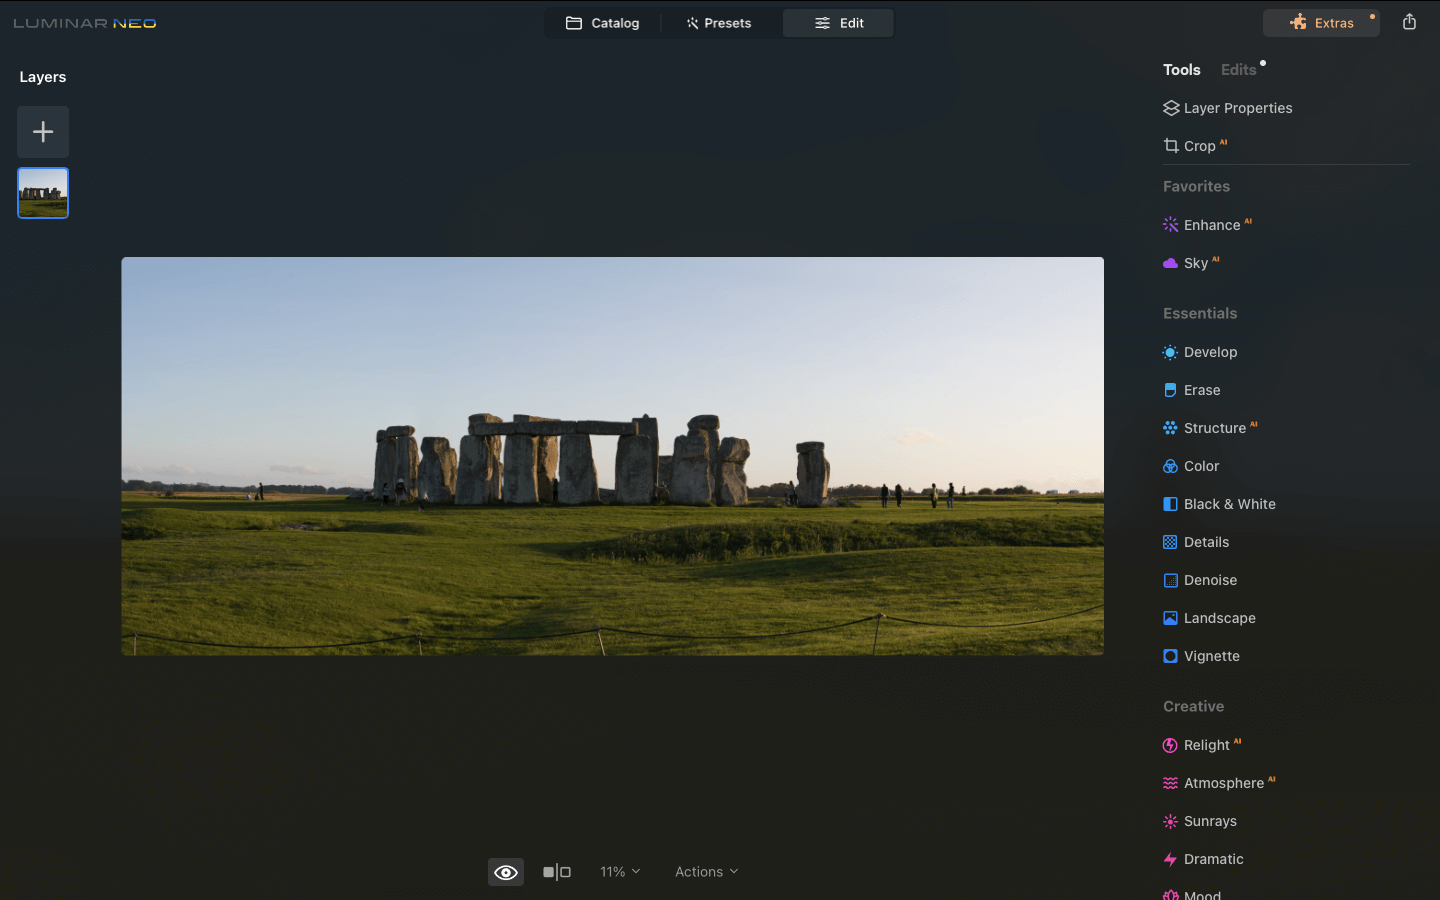
In the world of photography, file formats matter. While some photographers prefer DNG (Digital Negative) raw files for their editing flexibility, Luminar Neo generates TIF (Tagged Image File Format) files when using the Panorama Stitcher. While this might raise some eyebrows, it’s a minor drawback.
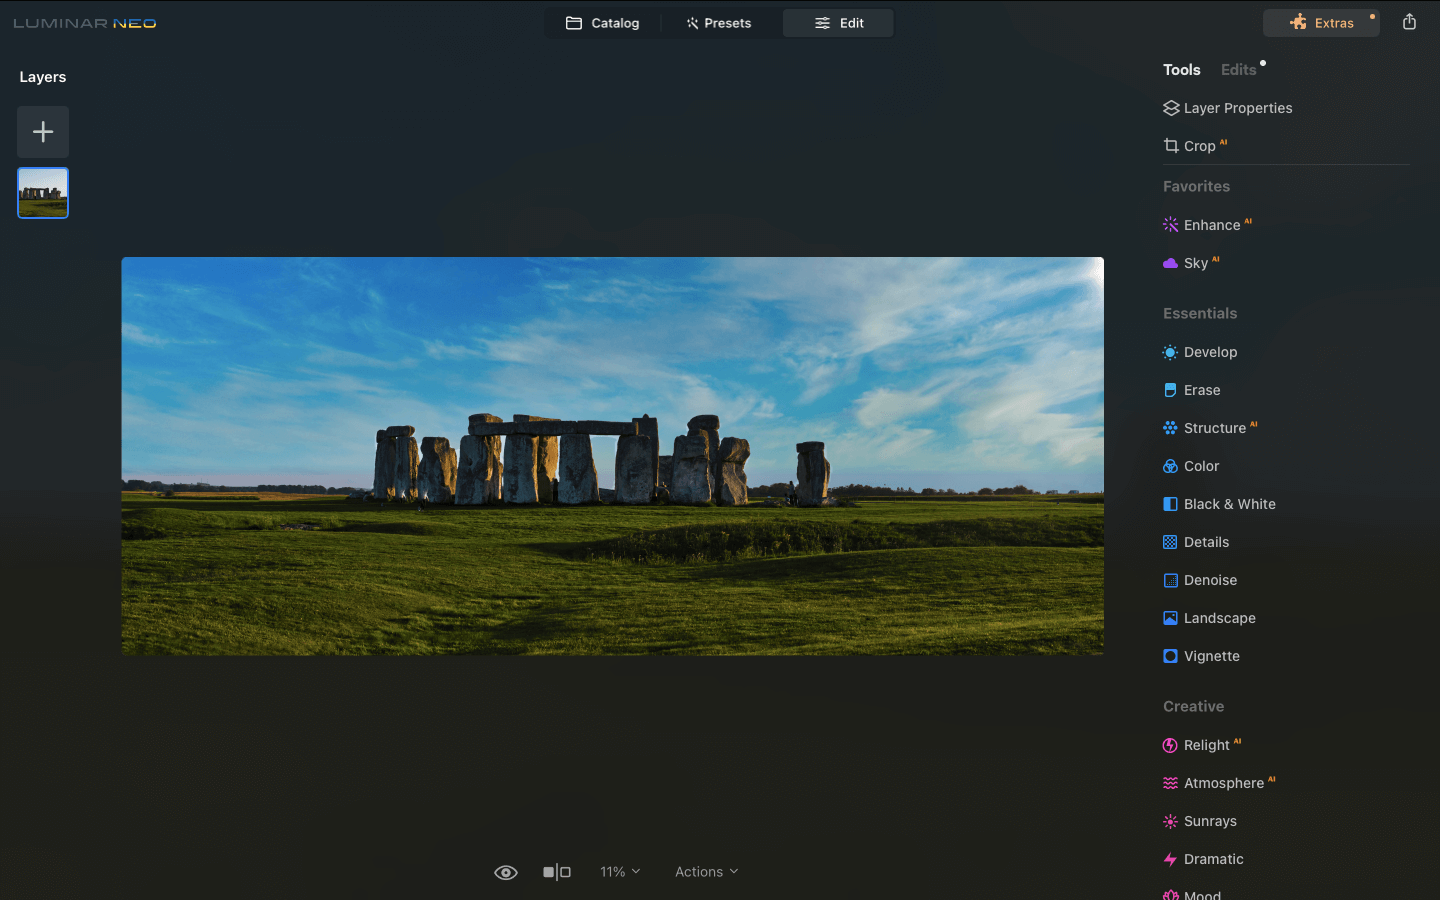
Luminar Neo’s Editing environment is non-destructive, ensuring that your edits don’t harm the original image. Even with TIF files, you can access the full array of Luminar Neo’s AI-powered tools, such as Enhance AI, Sky AI, and Structure AI, to enhance and refine your panoramas to perfection.
Cons:
Missing “Boundary Warp” and “Fill Edges”
No software is without its limitations, and Luminar Neo is no exception. One feature some photographers might miss is the “Boundary Warp” tool found in software like Adobe Photoshop or Adobe Lightroom. Boundary Warp automatically stretches your image to fit a rectangular frame, which is useful for minimal adjustments.
Without this feature, Luminar Neo requires you to manually clone stamp missing portions or use content-aware fill to address any issues with incomplete edges. While this may add a step to your workflow, considering the software’s other robust capabilities, it’s a minor inconvenience.
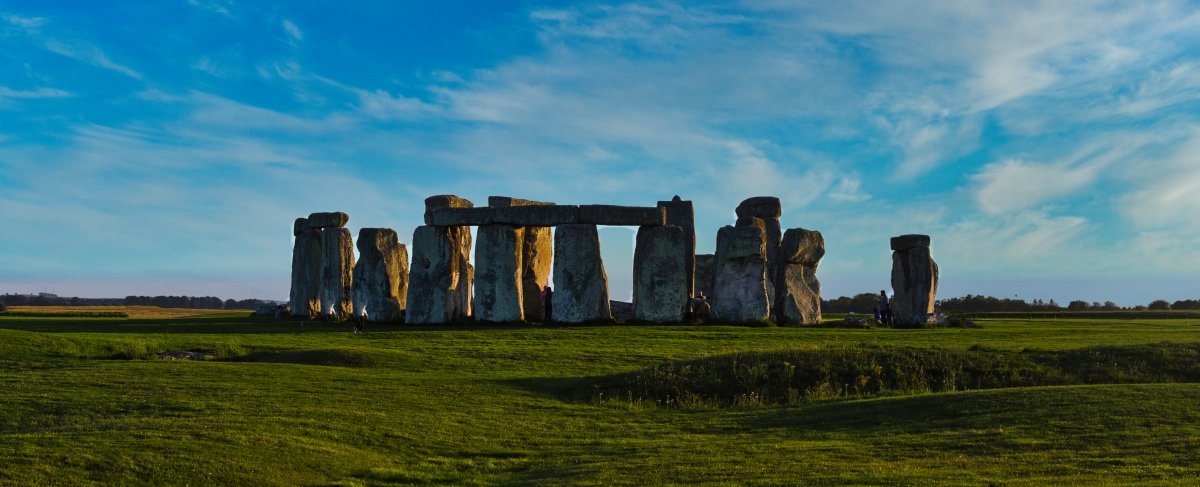
Before And After
Conclusion about Luminar Neo’s Panorama Stitching
In conclusion, Luminar Neo’s Panorama Stitcher is a powerful tool that opens up a world of creative possibilities for travel photographers and landscape enthusiasts. While there is room for refinement and feature expansion in future updates, the current iteration impresses with its seamless integration into the Luminar Neo workflow.
For both beginner and pro photographers, the Panorama Stitcher simplifies the process of creating stunning panoramic images. Its ability to transform video footage, create action composites, and offer versatile stitching methods sets it apart from the competition, such as Adobe Lightroom or Photoshop panorama stitching.
If you’re ready to take your landscape photography to the next level and unlock the potential of panoramic vistas, try the Luminar Neo Panorama Stitcher. Whether you’re capturing the magnificence of nature or the architectural beauty of urban landscapes. This one the best Panorama stitching software is also available for Mac.
Where To Purchase Luminar Neo Panorama Stitching Extension
For Luminar Neo Pro subscribers, the Panorama Stitching extension awaits in the “Extras” menu, available as part of your yearly subscription. Luminar Neo’s prices and extensions may vary depending on your location, so check the pricing page for the most up-to-date information.
And for those curious to explore, a free trial of Luminar Neo lets you experience the full range of extensions, including the Panorama Stitcher, before making your decision. Alternatively, you can click here to get an additional discount and use coupon code RECHO10 and buy now.
Panoramic photography is no longer a distant dream but an accessible one.
