Have you ever found yourself in a picturesque location, ready to capture a stunning landscape photo, only to end up with a disappointing result? As a photographer, I understand very early that capturing stunning landscape shots requires more than just having the right equipment. Knowing the best camera settings for landscape photography is essential to getting the perfect shot.
With so many hundreds of settings, it can be overwhelming to figure out which ones to use and when? That’s why in this post, I share my top recommendation on how to choose the best camera settings for landscape photography. This guide should help you take your photography skills to the next level.
“The camera is an instrument that teaches people how to see without a camera.” – Dorothea Lange
Let’s Understand the Basics of Camera Settings for Landscape Photography
As a landscape photographer, understanding the basic camera settings and photography fundamentals that affect the quality of your photos is crucial. Check out our recommendation for best camera for landscape photography.
I will distinguish you from endless daunting words. However, there are four main settings to pay attention to aperture, shutter speed, ISO, and white balance.
Three of the four (excluding white balance) are part of the exposure triangle. And each of these settings plays a critical role in determining the outcome.
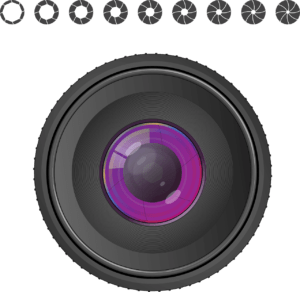
The aperture
It is the opening in the lens that determines the amount of light that enters the camera. It also controls the depth of field. A narrower aperture (higher f-number, such as F7.1 or more) is more common among landscape photographers as it gives more of the image in focus from the foreground to the background.
Shutter speed
This determines how long the camera’s sensor is open and exposed to light. A faster shutter speed can freeze motion and create sharp images, while a slower shutter speed can make blur and shows a sense of movement in moving elements such as waterfalls or clouds.
ISO
ISO maintains the camera’s sensitivity to light. A higher ISO can make the camera more light-sensitive, allowing for faster shutter speeds or narrower apertures in low-light conditions. However, a high ISO can also introduce noise and reduce image quality. A lower ISO is often preferred in landscape photography to ensure the highest possible image quality. Having said that, most modern cameras can handle big ISO with minimal noise. So a noisy image is better than a no or blurry image. 🙂
White balance
It determines the image’s colour balance (from warm to cool). Different lighting conditions can cast a color tint on your pictures, which you can adjust by dialing the proper white balance settings. For landscape photography, selecting the appropriate white balance setting for the lighting conditions is essential to ensure the most accurate and natural color reproduction. However you shoot in RAW, you have the option to change in post-processing as well.
All four settings are fundamental and equally important to get a picture of what you envisioned in my mind.
Here are a few Camera Settings for Landscape Photography to get started based on my experience
Now that you understand the basic camera settings that affect landscape photography, it’s time to put that knowledge into practice.
A great photograph is one that fully expresses what one feels, in the deepest sense, about what is being photographed- Ansel Adams
Here are some tips to help you choose the best camera settings for your landscape photos:
- Let’s start with the aperture
You remember from the last section that the aperture determines the depth of field in your images. Let’s consider you want to capture a mountain in the background, a river in mid-ground, and stone or grass in the foreground. In this case, you should choose a larger depth of field to ensure that the entire scene is in focus. A good starting point is to use an aperture of f/8 to f/11.
- Adjust ISO
The ISO setting determines the camera’s sensitivity to light. A lower ISO is ideal for bright lighting conditions, and a higher ISO is suitable for low-light situations. When shooting landscapes in daylight, use a low ISO, such as 100 or 200, to ensure the best image quality.
- Choose shutter speed
It depends are what you like to capture, mountains or waterfalls. So, to start with, along with a tripod, you can use a slower shutter speed. It can give you motion in the water, clouds, and other natural elements. And a good starting point is to use a shutter speed of 1/60th of a second or slower up to 1 sec.
- Adjust white balance
For landscapes, the “daylight” setting is often a good start, as it is suitable to match the color temperature of natural sunlight. And remember, if your camera can shoot in RAW, then you can change it later in post-processing.
- Consider the time of day and lighting
When you are just starting, not only your camera settings but weather as well as lighting conditions can completely change your picture.
So I recommend shooting during the golden hour (the hour after sunrise or before sunset) can produce soft, warm light that enhances the mood of the landscape.
- Use a tripod for better stability
It’s not a camera setting; a tripod can help you achieve sharper, especially when using longer exposures. A study by Lensrentals found that camera shake is the most common cause of image blur, and using a tripod can reduce blur by up to 60%. Check out our what is my camera bag.
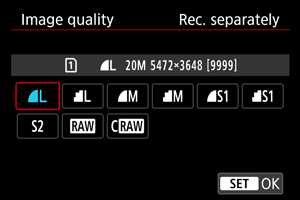
- Shoot in RAW format for better post-processing
Compared to JPEGs, RAW files capture more data and allow for more flexibility in post-processing.
Note: RAW files have a dynamic range of up to 14 stops, compared to the eight stops of JPEGs.
- Consider using a polarizing filter
Again, It’s not a camera setting; a polarizing filter can help reduce reflections and glare, enhance colors, and increase contrast in your landscape photos.
 Best Camera Settings for Landscape Photography Tips & Free Cheat Sheet
 Best Camera Settings for Landscape Photography Tips & Free Cheat Sheet
Now you got the fundamental of landscape photography and essential camera setting. Now, let me give you quick tips along with a cheat sheet that should help you to go out and start capturing.
- Bright sunlight: When shooting in bright sunlight, use a smaller aperture (higher f-stop number like f14 or f16) to reduce the amount of light entering the lens. It will help prevent overexposure and keep your photos from looking washed out. Bonus Tip: A lens hood can help to reduce lens flare from direct sunlight also can protect lens from scratch. Read more why every photographer should use lens hood.
- Cloudy or overcast conditions: In low-light conditions, use a larger aperture (lower f-stop number like f4 or f5.6) to allow more light to enter the lens. You can also increase your ISO to compensate for the lower light levels.
- Sunset or sunrise: During the golden hour, the light is warmer and softer, providing a beautiful natural light for photography. Use a wider aperture (i.e., f4 or f5.6) to capture the sun’s soft glow and warm hues.
- Night photography: It is one of my favorite genres of photography because it requires not only skill but also requires patience. I suggest using a wide aperture (low f-stop number like f1.2, f2.8) and a long shutter speed (15-20 seconds). Also, Adjust your ISO (somewhere ISO 800-3200) to achieve the right exposure and reduce noise. Bonus tip: You should use a wide-angle lens for astrophotography. Here is the our detail guide to understand about focal length and best lenses to choose.
- Moving subjects: When shooting landscapes with constantly moving subjects like waterfalls or sea waves, a faster shutter speed of around 1/100 sec works better to freeze the motion and to get moving motion (1/10 seconds – 1 second).
- Shooting stars: If you want to capture the galaxies and stars, use a wide aperture (around f/2.8 or wider) and a high ISO (around 3200 or higher).
- Capturing landscapes with people: Another interesting genre in which I struggled at the beginning of my journey to capture a landscape with people in it. So I found a faster shutter speed of around 1/500 to 1/1000 seconds to freeze their movement or a very slow shutter speed of 1-5 seconds to blur out people completely.
Remember, my recommendations may vary based on your style, the lighting conditions, and the camera and lens you’re using. Experiment with different settings to find what works best for you and the landscape you photograph.
Cheat Sheet
“The whole point of taking pictures is so that you don’t have to explain things with words.” – Elliott Erwitt
| Condition | Aperture | Shutter Speed | ISO | White Balance |
|---|---|---|---|---|
| Sunrise | f/8-f/16 | 1/30-1/60 sec | 100-400 | Daylight |
| Sunset | f/8-f/16 | 1/30-1/60 sec | 100-400 | Daylight |
| Bright sunlight | f/11-f/16 | 1/1000-1/2000 sec | 100-200 | Daylight |
| Cloudy day | f/8-f/11 | 1/60-1/125 sec | 200-400 | Cloudy |
| Night | f/2.8-f/4 | 10-30 sec | 800-3200 | Tungsten/Incandescent |
| Moving subject | f/5.6-f/8 | 1/250-1/500 sec | 400-800 | Daylight |
| Waterfalls | f/11-f/16 | 1-4 sec | 100-200 | Daylight |
| Stars | f/2.8-f/4 | 10-30 sec | 3200-6400 | Tungsten/Incandescent |
Practical Tips for Mastering Your Camera Settings
As with any other skill, mastering your photography or camera settings needs time and practice to get the hang of your camera and to become comfortable shooting.
Here are some of my learning and recommendations to help you master:
- Shoot in Manual Mode: It gives you complete control over your camera’s settings. You can adjust almost everything possible in the camera, such as
- the aperture, shutter speed, and ISO, to get the perfect exposure for your shot.
- Use a Tripod: Using a tripod is essential for landscape photography, as per my experience. It helps you keep your camera steady and allows you to take longer exposures without introducing a camera shake. Of course, cameras are getting better each year and can handle up to 8 seconds hand-held (Here is the list of the best cameras for landscape photography); still, I recommend a tripod to avoid any shake.
- Experiment with Different Settings: Be bold and experiment with different camera settings to get your desired look. Try different aperture settings to adjust the depth of field, also different shutter speeds to freeze or blur motion.
- Shoot in RAW: Shooting in RAW gives you more flexibility in post-processing as it contains more information than JPEG files and allows you to adjust exposure, white balance, and other settings without losing image quality. I strongly recommend shooting in RAW always. Check out how you can copyright your photograph as a creator.
- Learn the Sunny 16 Rule: The Sunny 16 Rule is a basic guideline for getting the correct exposure to bright sunlight without using a light meter. It recommends that on a sunny day, set your aperture to f/16 and your shutter speed to the reciprocal of your ISO (e.g., if your ISO is 200, set your shutter speed to 1/200).
- Practice, Practice, Practice: Once again, the best way to master your camera settings is to practice as much as possible. If you are like me, take your camera with you everywhere and experiment with different settings in different lighting conditions. The more you practice, the more comfortable you’ll become with your camera’s settings, and the better your landscape photography will be.
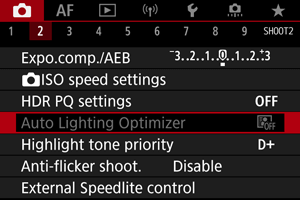
- Advantage of exposure compensation: You might see that many landscape photos feature bright skies and darker foregrounds, which can be a challenge for getting a properly exposed shot. By using exposure compensation, you can adjust the overall exposure of the photo to compensate for these lighting differences. It can help you get a more balanced and appealing shot.
- Exposure bracketing(HDR): Bracketing involves taking multiple shots of the same scene with different exposure settings. This technique can help you capture a broader range of tones and details in the photo, especially in difficult lighting conditions like mid-day lighting.
- Use focus stacking: In landscape photography, you often want everything in the scene to be in sharp focus. One way to achieve this is by using focus stacking, which involves taking multiple shots at different focus distances and blending them in post-processing. It is my favourite, as it works in any lighting conditions. Learn how you can arrange in frame with natural elements in landscape photography and take multiple focus points shot to focus stack later in post-processing.
Based on these recommendations, you’ll be well on journey to mastering your camera settings for landscape photography.
With time and practice, you’ll be able to capture stunning landscape photos that truly showcase the beauty of the natural world from your perspective.
Conclusion
By now, you will get a fair idea of the foundation of good photography and the importance of camera settings in creating stunning images. Aperture, shutter speed, ISO, and white balance are the key settings that affect your photos’ exposure and visual effect. And it is important to consider the lighting conditions and the type of landscape you are shooting to determine the appropriate settings.
As I said, to master your camera settings, practice shooting in manual mode, shoot as much as possible, and experiment with different settings to find what works best for your style and vision. Using a tripod and other accessories can also greatly enhance the quality of your images.
Remember that the beauty of landscape photography lies in its diversity and uniqueness, so don’t be afraid to try new things and find your own approach to capturing the beauty of nature.
With the right camera settings and techniques, you can create breathtaking images that capture the essence and beauty of the world around us.
FAQ: Camera Settings for Landscape Photography
What is the best aperture setting for landscape photography?
A smaller aperture (higher f-number) is more famous for capturing a deeper depth of field in landscape photography. An aperture of f/8 to f/11 is a good starting point, but it can vary depending on the scene and the effect you want to achieve.
What is the best shutter speed for landscape photography?
The ideal shutter speed for landscape photography varies depending on the lighting conditions and the effect you want to achieve. As a general rule, it is recommended to use a slow shutter speed (1/30 sec or slower) to capture motion blur in waterfalls or clouds, and a fast shutter speed (1/250 sec or faster) to freeze the motion of a moving subject.
What ISO should I use for landscape photography?
I recommend using the lowest ISO setting possible (usually ISO 100 or 200) in landscape photography to minimize noise and maintain image quality. However, in low-light situations, you may need to increase the ISO to capture the scene with sufficient brightness.
What white balance setting should I use for landscape photography?
ou should adjust the white balance based on the lighting available in the scene. The “daylight” or “sunny” white balance setting works well for landscapes taken during daylight hours. However, you may need to adjust the white balance to “cloudy” or “shade” in overcast or shaded areas.
Should I shoot in RAW or JPEG format for landscape photography?
Shooting in RAW format allows for greater flexibility in post-processing, as it captures more data than JPEG. However, RAW files take up more space and require more processing time. Shooting in RAW is highly recommended if you plan to do extensive post-processing.
Should I use manual mode for landscape photography?
Shooting in manual mode gives you complete control over all camera settings, which is important for achieving the desired effect in landscape photography. However, if you are starting, aperture or shutter priority mode can be an excellent way to begin experimenting with different settings.
Do I need a tripod for landscape photography?
A tripod is highly recommended for landscape photography, as it helps to stabilize the camera and prevent blurry photos. A sturdy tripod can also allow you to use slower shutter speeds, which can help you capture stunning landscape shots.
What other gear is recommended for landscape photography?
In addition to a tripod, a wide-angle lens, polarizing filter, and remote shutter release can be helpful for landscape photography. A lens hood can also help to reduce lens flare and increase image contrast.
What is the most important thing to remember when choosing camera settings for landscape photography?
In addition to a tripod, a wide-angle lens, polarizing filter, and remote shutter release can be helpful for landscape photography. A lens hood can also help to reduce lens flare and increase image contrast.
What is the best time of day for landscape photography?
The best time of day for landscape photography is during the golden hour, the hour after sunrise, and the hour before sunset. The light is soft and warm during this time, creating beautiful colors and long shadows.
What are some tips for shooting waterfalls in landscape photography?
To capture waterfalls, use a slow shutter speed to create a soft and dreamy effect. You can also use a polarizing filter to reduce glare and increase saturation.
How can I capture the stars in landscape photography?
To capture the stars, use a fast aperture, a high ISO, and a long exposure. It’s also essential to find a dark location with minimal light pollution and decent composition.


