Before going to step by step to install Lightroom presets, let me share importance or value of this in my life. As a travel blogger and landscape photographer, I need to properly organise my pictures to use in article, and it should be easy to find when I need. I manage all my 10 years of photographs in Lightroom catalogue with the help of collections, keywords and folder structures.
Adobe Lightroom is one of the oldest and famous photo editing application. Lightroom Desktop, Lightroom Mobile or Lightroom iPad are widely used by all amateur to professional photographers. And as I mentioned before, one of the reason to choose Adobe Lightroom is its photo organising capability with library, catalogs etc. Check which tool is right for your landscape photography Adobe Lightroom or Photoshop?
Lightroom market share by users around over 30%. As a result Adobe Lightroom tutorials and Adobe Lightroom Presets are widely available. Digital creator and photographers create and sell their presets online as an additional revenue stream.
Why Another Tutorial on How to Install Adobe Lightroom?
There are tons of guides, tutorials available to teach how to install Lightroom presets. However, I try to simplify presets installation procedure, so it is easy for everyone including beginner.
I will cover Adobe Lightroom presets installation procedure based on type of device and Lightroom version. I know time is more valuable than anything else and so created segment down below, you can select from below sections to understand the step by step guide to install Lightroom presets based on your device type.
- Lightroom CC – Desktop and Cloud
- Lightroom Classic – Desktop
- Method to install presets in Lightroom Mobile
- Adobe Lightroom Mobile – Android
- Adobe Lightroom Mobile – iOS
To get started, the download relevant zip file from the link on email or RGWords Shop (Launching Soon) (e.g. RGWords_Winter_Landscape_Presets.zip (desktop or mobile). RGWords presets bundles are compatible with all types of devices.
Installing Presets in Lightroom Classic (Version 7.3 or later)
This procedure is for the latest versions of Adobe Lightroom Classic, released since mid-2018 which uses the XMP presets format. You need to have version 7.3 or later.
- Download the preset zip file (e.g. RGWords_Winter_Landscape_Presets.zip) and extract in disk (Use WinZip(Paid but trial available) or 7zip (free open source) in Windows and double click in Mac). You should see file like RGWords_Winter_Landscape_Presets_X.zip.
- Open Lightroom Classic and go to the Develop module next to Library in the top right side.

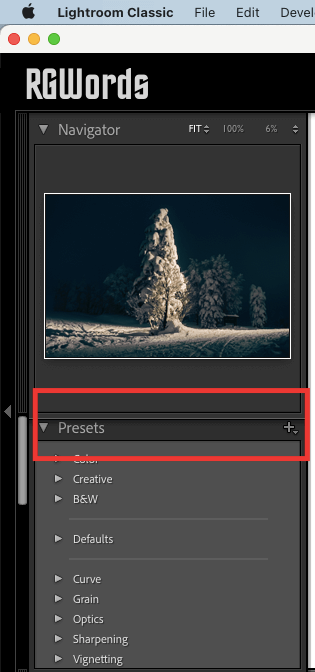
Develop Module - On the left you will see a section called Presets. If you open that you will see that there are already some default presets listed and all other presets will listed here.

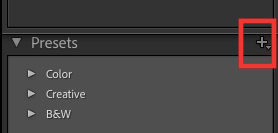
Presets Module - Click on the + icon at the top right of the Presets section.

Install Lightroom - Select Import Presets from the dropdown menu.
- Navigate to the folder where you extracted from Step-1. Select the presets zip files with like RGWords_Winter_Landscape_Presets__X.zip and click Import. (Importing the zip file is the preferred method, because it preserves the folder structure).
- Now, presets will list in the Presets section for use.
Installing presets in Lightroom Classic & Lightroom 4, 5, 6 (version 7.2 or older)
The instructions are for Lightroom 4, 5, 6, and Lightroom Classic (CC) earlier than version 7.3 (April 2018) using the .lrtemplate file extension instead of the newer XMP format.
- Download the preset zip file (e.g. RGWords_Landscape_Presets.zip) and extract in disk (Use WinZip(Paid but trial available) or 7zip (free open source) in Windows and double click in Mac). You should see file like RGWords_Landscape_Presets_L.zip
- Open Lightroom and click on Preferences and go to the Presets tab.
- Click on the button Show Lightroom Presets Folder.
- Double click on the Lightroom folder, then double click on Develop Presets folder.
- Navigate to the folder Lightroom 4-6 and Classic CC before Apr 2018 (.lrtemplate) and copy the folder(s) RGWords_Landscape_Presets_L into the Develop Presets folder.
- Restart Lightroom and you are good to go!
Installing presets in Lightroom (CC) — Mac or Windows
These instructions are for Adobe Lightroom 1.3 onwards.
- Download the preset zip file (e.g. RGWords_Nature_Preset.zip) and extract in disk (Use WinZip(Paid but trial available) or 7zip (free open source) in Windows and double click in Mac). You should see file like RGWords_Winter_Landscape_desktop_L.zip
- Open Lightroom CC and click on the edit icon at the top right. The icon looks like three sliders—three horizontal bars with circles on them.
- At the bottom on the screen click Presets button. The presets panel is now revealed.
- Click on the three dots at the top •••
- In the dropdown menu select Import Presets.
- Navigate to the folder Lightroom and Lightroom Classic since Apr 2018 (.XMP), select the presets zip file(s) and click Import.
- All of the presets will now be listed in the Presets panel.
Installing presets in Lightroom Mobile
Method 1: via Lightroom on desktop (using XMP presets)
You must install the presets in the Lightroom desktop application (not Lightroom Classic) on your Windows or Mac computer first. Once they are installed, the presets will automatically sync to your mobile device via the cloud. See also: Step-by-step guide by Adobe.
Method 2: via Lightroom Mobile app
Below you will find installation instructions on how to install Lightroom Presets in the free Lightroom Mobile app for Apple iOS and Android for which you do not need a paid version of Lightroom. However, this installation method is very time-consuming on iOS devices, and method 1 is clearly recommended if you have a Creative Cloud subscription.
Note that with RGWords Presets Bundle, you will get DNG file as well for Method 2.
Installation Guide for Lightroom Mobile app (Android)
Please make sure you have the latest version of the app installed:
- Download the presets zip file (e.g. RGWords_Seascape_Presets.zip). You should see file like RGWords_Winter_Landscape_M.zip . Now extract in to My Files application.
- Open the Lightroom application on your phone (Download in Play Store) and select an image from your library and press to open it.
- Slide the toolbar to the bottom to the right and press the “Presets” tab. Press the three dots to open the menu and select “Import Presets“.
- Your file explorer appears on the screen. Navigate to the folder on your phone where you downloaded the zip file (e.g. RGWords_Seascape_Presets_M.zip)file and press the zip file to import the presets. (If you cannot import the zip file directly, use the “My Files” app on your phone to extract the contents of the zip file first.)
- Your presets will now be imported and will be available under a new group in the “Presets” tab.
Installation Guide for Lightroom Mobile app (iPhone /iPad / iOS 14)
Please make sure you have the latest version of the app installed:
- Download the presets zip file (e.g. RGWords_Cinematic_Presets.zip) from website or email link. You should see file like RGWords_Cinermatic_Presets_M.zip .Once the download is complete, press the download icon in the upper right corner of your screen to open the “Files” app on your phone.
- Click presets file, and then the content will be extracted and a new folder should automatically appear. If you don’t have a “Files” application installed.
- Open the Lightroom Mobile app on your iPhone (Download in App Store).
- Click the “+” icon in your library and choose to create new “Folder”. Name the new folder or new album “RGWords Presets” and open the folder/album.
- Open the album and press the “Add” icon in order to add new images. Navigate to the folder you extracted from the downloaded zip file and select all DNG files in the folder. When you have selected all, choose “Open“.
- Open the first DNG image and press the icon with the three dots to open the menu and select “Create Preset“.
- Name your presets after the preset pack (eg. RGWords_Cinematic_Preset_1). In “Preset Group“, select “Create New Preset Group” and name it after the name of the preset pack (e.g. RGWords Presets). Uncheck “Tools”, “Details”, “Optics” and “Geometry”. Under the “Light” tab uncheck “Exposure”, and under the “Color” tab make sure to uncheck “White Balance”. Press the tick to create the preset.
- Follow the same method as in steps 5 and 6 to create your presets from the other DNG files.
- When you finished, you will now find the presets under the “Presets” panel.
Note that with RGWords Preset Bundle, you will get DNG file as well for Method 2.
Conclusion
I hope this article help you to install Lightroom presets perfectly. Please let me know in comment below if you have any question. If things are working fine, tag me in Instagram or use hashtag #RGWordsPresets, I will glad to see your edit.
As I always believe presets can be good starting point, and can save lot of time and avoid repetitive work.
The best thing about a picture is that it never changes, even when the people in it do.


