Licensable Badge in Google Images Search is such a nice feature for every photographer. It shows all copyright information along with a photograph in image search. As a travel and landscape photographer, I would always prefer to protect my work. Above all, it is suitable for the audience to know more about the creator. In this blog, I will share step by step process to add Copyright Metadata in Lightroom correctly.
A few months back, I discovered the licensable badge in Google Image Search. Then I did a little more deep dive on this subject to understand better.
That is to say, I decided to share step by step process with you all. I considered that you could get all the right and helpful information about copyright metadata in Lightroom and other photo editing tools. In my last post, I shared, “what is licensable badge, important IPTC metadata to embed in any photograph.”
How To Add Copyright Metadata in Lightroom
Check which tool is right for your landscape photography Adobe Lightroom or Photoshop? There can be so many ways to embed copyright metadata into your photograph. However, I use Adobe Lightroom Classic majority of the time. So in this post, I will cover all panels you can use in Adobe Lightroom to create your own Lightroom presets for copyright metadata. If you are interested in step-by-step process in Adobe Photoshop, Check here!
How Copyright Metadata display in Google Image Search
I already covered in detail how copyright metadata shows up in search. Here is a sample,
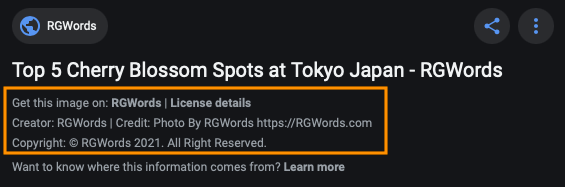
There is a hyperlink to the photographer’s website, along with another link to a page for license details. Likewise, the search results show the name of the image’s creator, a credit line for how to credit the photo, as well as copyright information.
All informations is retrieved from the metadata embedded in the photograph. However you need to take these steps to add information in the photo before publication to the web.
Important IPTC Copyright Metadata Fields
- IPTC Copyright
- Copyright
- Copyright Info URL
- IPTC Status
- Credit Line
- IPTC Extension Rights
- Licensor
- IPTC Creator
- Creator
Step by Step Process to Add Copyright Metadata using Adobe Lightroom Classic
In Adobe Lightroom Classic, all relevant fields are available in the Metadata Panel, using the dropdown to select IPTC and IPTC Extension.
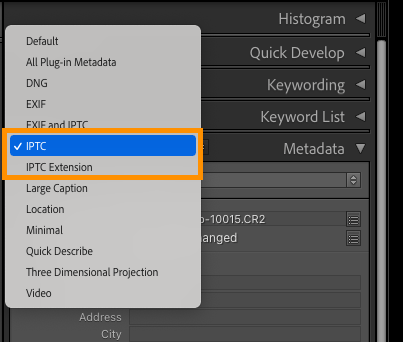
In this guide, we will use IPTC and IPTC Extension Metadata.
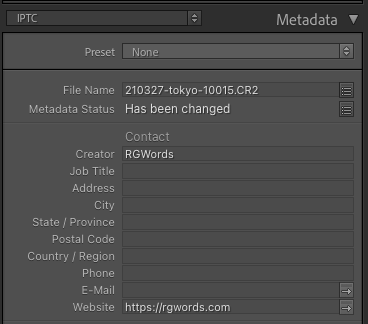
Creator
To display the image’s creator name, Google will use either the XMP dc: creator field or the IPTC Creator field. To enter this in Lightroom, enter it in the Creator field.
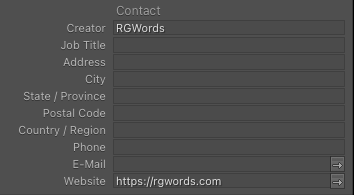
Here you can add your name, organisation name, or trade name who responsible for creating the image.
Credit Line
Likewise, If you go down in the IPTC Metadata panel, next is the Status section after Images Section. Here important metadata field is Credit Line.
Credit Line field is to inform search engine about credit to the photographer when a photograph publishes on the web. Certainly, this is the most important one, therefore you shouldn’t leave blank.
Again, Google will use either the XMP photoshop: credit field or the IPTC Credit field to show this information.
As the Credit Line displays along side of the photo, you should add the right text such as “Photo By RGWords”.

Copyright & Rights
It is one of the essential Copyright Metadata to add to the photographs. To display the copyright notice, Google will show either the XMP dc: rights field or the IPTC Copyright Notice field.
You need to write the copyright notice field in the IPTC metadata panel.
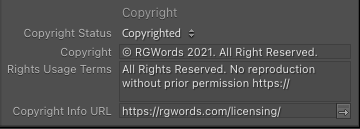
Here, you need to add the correct copyright information, usage terms, and licensing URL (if applicable). Make sure to check any legislation/regulation based on the country you leave.
Copyright Info URL can be URL on your website describing licensing or pointing to a Creative Commons or other commercial license URL. This will clickable link display in the image search result alongside your photograph.
Licensor URL
The last essential copyright metadata is “Licensor URL” field. It triggers the “Get this image on” link in Google Image search.
This field is challenging to find, but you can access it in the IPTC Extension metadata panel in Lightroom.
Go to the IPTC Extension metadata panel, click on the Licensor field under the Rights section. You can enter various fields here if you like, but must to have one which Google is looking for is called URL.
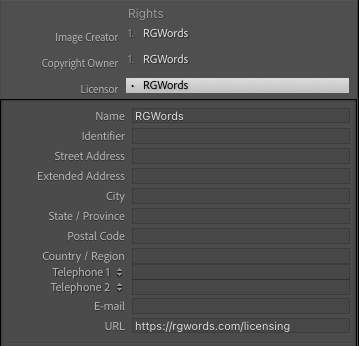
The Licensor URL should contain valid web page URL which contains all information about usage right, licensing and contact. It is not mandatory to have your domain name.However, it is always good to have. (For example, RGWords Licensing Page)
Lightroom Preset for Copyright Metadata
Above All, Adobe Lightroom preset is a most efficient way to do the batch processing and repetitive task. You might know about Lightroom presets for photo editing and how to create and install presets, the same way you can create IPTC metadata preset.
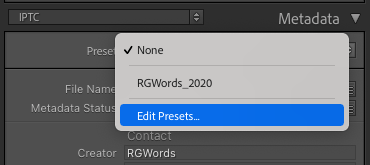
To create a metadata preset in Lightroom, choose Metadata > Edit Metadata Presets from the menu.
I already mentioned the above list of important metadata fields which Google is looking for.
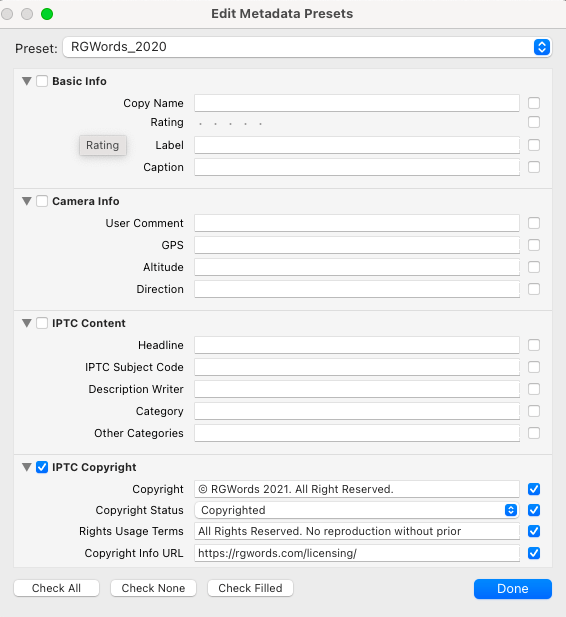
Note: As of writing this post, writing the Licensor URL is not possible in Lightroom’s preset editor window.
However, You need to select an individual photo in Lightroom Library. And use the IPTC extension in Lightroom Metadata Panel to enter the information.
While that photo is still selected in the Library, go to the Edit Metadata Presets window. And Under IPTC Extension Rights, the presets window will show “1 item”.
Choose Replace and check the box to the right to include that item in your preset. It means you are using the metadata in your selected image to set this field when creating the preset.

Lightroom Export Setting of Copyright Metadata
When you export images from Adobe Lightroom for publication on the web, you should be careful.
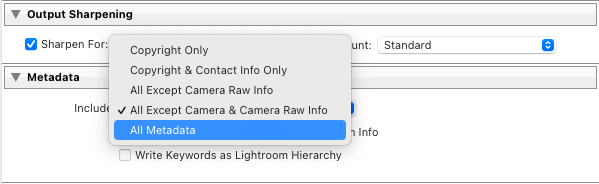
In the Lightroom export box, under Metadata, there are various options for Metadata to include on export.
Note:
- Copyright Only – It removes Creator, Credit Line, and Licensor URL
- Copyright & Contact Info Only – It removes Credit Line and Licensor URL
- All Except Camera Raw Info – It includes all essential metadata fields
- (Recommend) All Except Camera & Camera Raw Info – It Includes all essential metadata fields
- (Good Choice) All Metadata – It includes all essential metadata fields
Verify Copyright Metadata
Once you have exported your images from Lightroom or already published them to the web, IPTC has a metadata checker tool. You can use it to verify embedded copyright metadata in your photograph.
Certainly, if you have any questions about this method, please post in the comment. That is to say, You can check how to add IPTC copyright metadata using photoshop.


