
In this Photoshop tutorial, learn how to add contact and IPTC copyright metadata informations. Copyright metadata is must to include information in any of the photographs. As travel and landscape photographer, it helps me to protect my work, help search engine to show licensable badge.
Recently, I discovered the licensable badge in Google Image Search. So, I decided to share step by step process with you all using Adobe Photoshop . I considered that you could get all the right and helpful information about copyright metadata in photoshop and other photo editing tools. In my last post, I shared, “what is licensable badge, important IPTC metadata to embed in any photograph etc.”
How To Add Copyright Metadata in Photoshop
Check which tool is right for your landscape photography Adobe Lightroom or Photoshop? There can be so many ways to embed copyright metadata into your photograph. I use Adobe Lightroom Classic majority of the time. However, I use Adobe Photoshop as well to create infographics, travel blog assets and landscape photo editing So in this post, I will cover all panels you can use in Adobe Photoshop to create your own presets for copyright metadata. If you are interested in step-by-step process to add copyright metadata in Adobe Lightroom, check here!
How Copyright Metadata display in Google Image Search
I already covered in detail how copyright metadata shows up in search. Here is a sample,

There is a hyperlink to the photographer’s website, along with another link to a page for license details. Likewise, the search results show the name of the image’s creator, a credit line for how to credit the photo, as well as copyright information.
All informations is retrieved from the metadata embedded in the photograph. However you need to take these steps to add information in the photo before publication to the web.
Important IPTC Copyright Metadata Fields
- IPTC Copyright
- Copyright
- Copyright Info URL
- IPTC Status
- Credit Line
- IPTC Extension Rights
- Licensor
- IPTC Creator
- Creator
Step by Step Process to Add Copyright Metadata using Adobe Photoshop
All relevant copyright metadata (i.e. contact and copyright info) are available inside photoshop File Info Section. Let’s start with creating document in Adobe Photoshop, then I will walk you through all panel step by step to add right copyright info. Also I will cover how you can create template or preset to save your time and improve your editing workflow.
Create a new Photoshop document
To create the template, all we need is a blank Photoshop document. Go up to the File menu in the Menu Bar and choose New:

I will select any default size for this tutorial, and it will work exactly the same for any Photoshop document.

Once you document is created, Go up to the File menu in the Menu Bar again and choose File Info:

Great, Now we have Photoshop document ready to add Copyright Metadata!
Open the File Info dialog box
Following the last step, click on File Info Menu, and you will see pop-up box something like this
 It has lot many fields related to metadata which we can embed in photograph. However today we will see relevant metadata or minimum metadata which appears in search engine.
We are majorly using 3 sections i.e. Basic, IPTC, IPTC Extension

Select the Basic Panel
Start by entering your copyright information. In the File Info dialog box, make sure that the Basic category is selected on the left:
 Add Author (Document Author Individual Name, Company Name), Author Title (Name or Business Title), Change Copyright Status to Copyrighted. Additionally you can also add Keywords, Copyright Notice (Notice is visible in search engine), Copyright Info URL (send view to your license page to understand terms and conditions).
Note: How to type the copyright symbol
- On a Windows PC, press and hold the Alt key on your keyboard and enter 0169 on the numeric keypad.
- On a Mac, press Option+G.
Switch to the IPTC Panel
IPTC is global standard for metadata and in this panel all fields are as per IPTC only. Google also use the same standard to check metadata in photograph. Make sure to add right information, as it will be embed with your photograph and publish in web.
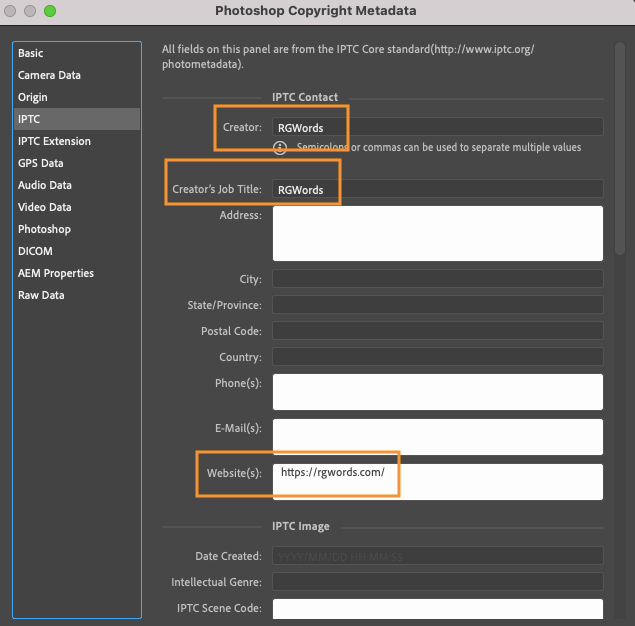
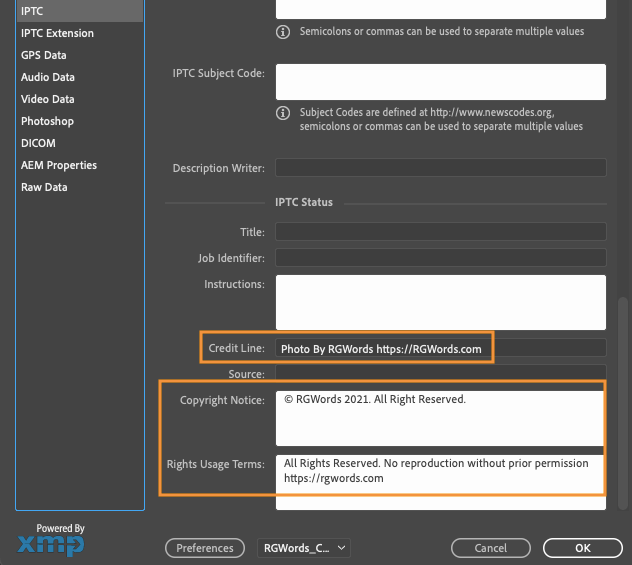
All Important metadata tags marked in above picture. Add Creator (your name or business name), Website, Credit Line (Display in search engine), Copyright Notice, and Right Usgae Terms. If you want do more, you can do so, but all tags will not require to search engine. Also Metadata tags can increase your file size.
Next Go to IPTC Extension Panel
There are few license related information are inside IPTC Extension Panel.

Here, three tags Image Creator (Individual Name or Business Name as per Legal), Copyright Owner (Individual Name or Business Name as per Legal), and Licensor (Individual Name or Business Name as per Legal or Website page to explain in details).
To add this just double click on empty area and add Name and click Insert.
Hurrah !!! Here your photograph is ready with copyright Metadata and ready to publish to web. Google might take few days to few weeks to crawl and publish in image search result.
Photoshop Template or Preset for Copyright Metadata
Even though, to add metadata is pretty straight forward and doesn’t take more than 2 minutes to do that. Having said that, there is more efficient way to do that which is to create Photoshop Template Or Preset or XMP file for contact Info. With photoshop template you can add copyright metadata in one or thousands photograph with just few clicks.
To create a metadata preset or template in Adobe Photoshop, choose File > File Info from the menu
 Add All Information as I explained above, Select Export as .XMP file.
Apply Preset and Choose an Import option
Before applying the template, Photoshop will open the Import Options dialog box asking what you’d like to do with any information that’s already included in the file’s properties. And there are three options to choose from:

- Clear existing properties and replace with template properties will clear all existing properties, including those that are specific to the image (Document Title, Description, Keywords, etc). It will then add only your contact and copyright info from the template, leaving everything else blank. Generally, this is not the option you want.
- Keep original metadata, but replace matching properties from template will replace any existing contact and copyright info with the details from your template. Everything else (Document Title, Description, Keywords, etc.) will be left alone.
- Keep original metadata, but append matching properties from template is similar to the previous option. But instead of replacing the existing contact and copyright information, it will keep any information that already exists and only add the details that are missing.(Recommended from side)
You can try all the options and see which work best for your case. If you add metadata in using Adobe Lightroom Preset or adding in-camera, then option-2 will work better for you.
Verify Copyright Metadata
Once you have exported your images from Photoshop or already published them to the web, IPTC has a metadata checker tool. You can use it to verify embedded copyright metadata in your photograph.
Certainly, if you have any questions about this method, please post in the comment. That is to say, You can check how to add IPTC copyright metadata using Lightroom.
Check Out Travel Blog Section


